


- Top >
Sample setting of IPP printing in Windows
Warnings
-
You must have an ITC account to output on a printer on campus.
-
Please perform this task after you have connected to the network with the PC that you have set up.
-
When setting has been completed, you may delete the files you have downloaded and files or folders you have decompressed.
-
This procedure was prepared for Windows 10 (64bit version).
Preparing the printer driver
-
Make sure whether the OS of the PC you will set is a 32-bit or 64-bit version.
How to check the number of bits in Windows 10 (Japanese article)
How to check the number of bits in Windows 8.1
How to check the number of bits in Windows 7 (Japanese article) -
Download the [ART EX printer driver (Microsoft WHQL authenticated driver)] from the Fuji Xerox web site .
※ Notated as "(32 bits)" for 32-bit version or "(64 bits)" for 64-bit version.
-
Download the printer driver to any location you wish.
※This procedure saves the driver on your Desk Top.
-
Double click the saved file to execute it.
※When it is installed by a standard user, enter the user name and password of the Administrator or other manager’s account, then click the [OK] button.
-
The licensing agreement is displayed, so click [Yes].

-
Decompression of the file begins, so wait until it is completed.
※After decompression, if [Do you want to allow the following application to make changes to this computer?] is displayed, click [Yes].After decompression, a folder with the same name as the file is generated at the same place.
※You must specify the driver in the folder by the following steps.
-
The driver install tool is displayed, so click [Cancel] without any selection.
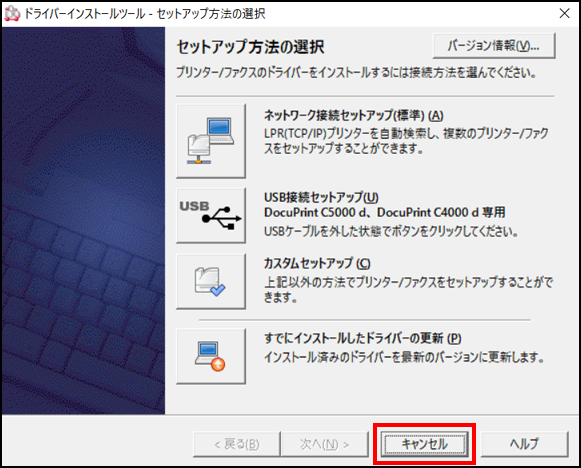
-
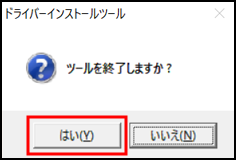
[Do you want to end this tool?] is displayed, so click [Yes].
-
This completes preparation of the printer driver.
Registering the printer
-
Open the Control Panel
※ Windows 10/8.1: Display the [List Menu] with the [Win] key + [X] key and select Control Panel.
※ Windows 7 : Select [Control panel] from [Start Menu].Select [Hardware and Sound] and select [Add a printer] from [Devices and Printers].

And only on Windows 7, select [Add a network, wireless, or Bluetooth printer] on [What type of printer do you want to install] screen.
-
It begins to search for the printer, but click [What if Windows doesn't find my device?] or [The printer that I want isn't listed].

-
On [Find a printer by another options], select [Select a shared printer by name].
Enter https://ipp.user.keio.ac.jp/printers/itc-ips/.printer to the entry box and click [Next].
-
[Enter network password] dialog box is displayed.
Enter your ITC account’s user name to [User name] and enter your ITC account’s password to [Password].
※As an example, the user name: ua123456 is used here.
-
When the correct user name and password have been entered, the dialog box to designate driver is displayed.
Click [Have Disk] to specify the printer driver that you have prepared.
-
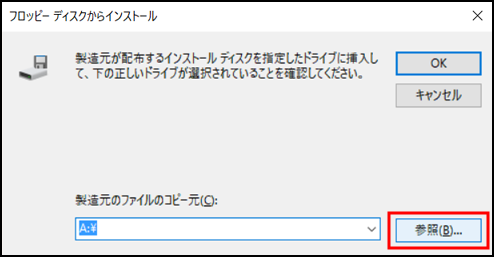
The dialog box, [Install from floppy disk] is displayed so click [Refer].
-
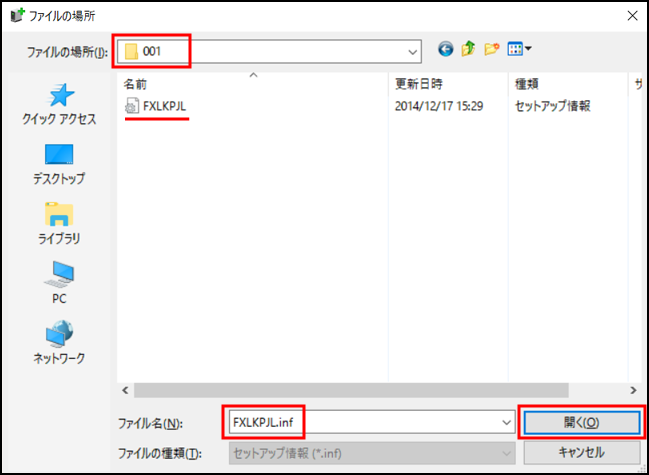
Select the [001] folder in the folder you decompressed when preparing the printer driver.
※ A decompressed folder is usually saved in the same place as the downloaded driver.Location of 001 folder in 64-bit version: [fxdpc5000dplw151110wxp6fja] → [cswnd] → [ART_EX] → [amd64] → [001]
Location of 001 folder in 32-bit version: [fxdpc5000dplw151110w2k3fja] → [cswnd] → [ART_EX] → [i386] → [001]When the [001] folder is selected, [FXLKPL] or [FXLKPJL.inf] is entered automatically into the file name box, so click [Open].
-
It returns to the dialog box [Install from floppy disk] so click [OK].

-
On the printer driver selection screen, select [FX DocuPrint C5000 d] and click [OK].
※When a standard user performs the task, you may be asked for the Administrator account password so, enter the password and click [OK].
-
Copying of the file starts and the printer driver is installed.
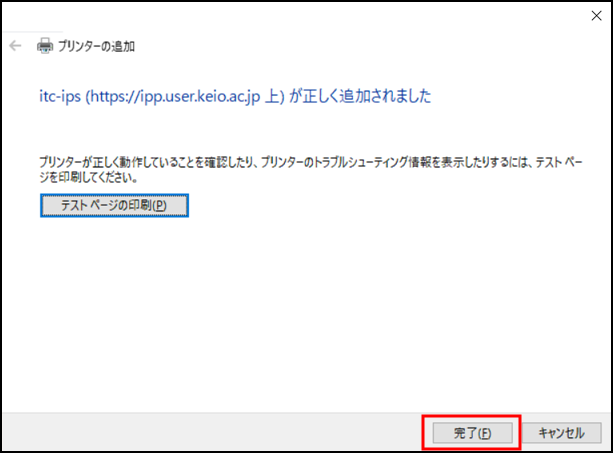
Confirm that [itc-ipp (https://ipp.user.keio.ac.jp) has been correctly added] has been displayed, then click [Next].
-
Click [Complete] to close the wizard.
-
This completes the registration of the printer.
Setting Printer
-
Setting the printer that has been added.
Click [View Devices and Printers] on [Hardware and Sound] on the Control Panel.
-
Right-click the printer that has been added to display the menu then select [Printer properties].

-
The name of the printer cannot be revised, so it is possible to enter an easily understood character string in the [Comment] box.
(This setting is optional.)
-
Select the [Advanced] tab.
Select [Spool print documents so program finishes printing faster] then select [Start printing after last page is spooled].
-
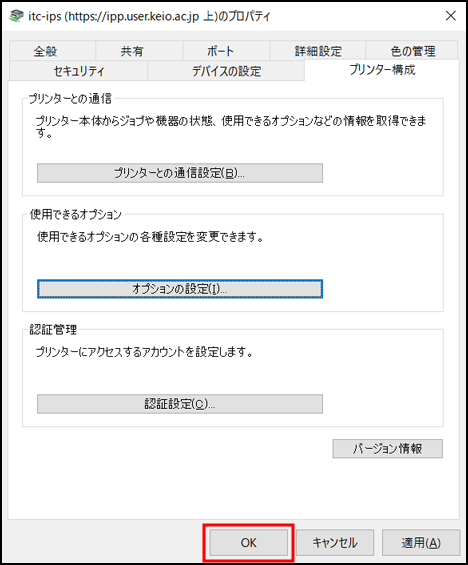
Select the [Configuration] tab and click [Set options].

-
Make the following settings and click [OK].
[Internal hard disk] → Installed
[Memory capacity] → 1,536MB
[Paper tray setup] → 4 trays

-
Return to printer property screen and click [OK].
-
The above procedure completes the setting of the printer.
Setting Printer (Black & White printing as the default)
Making the following settings, selects Black & White printing as the standard.
-
Right-click the printer that has been added to display the menu then select [Printer Properties].
-
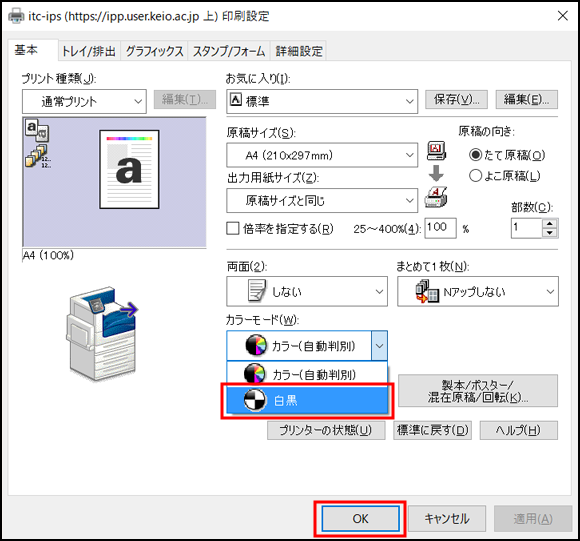
After [Printer Properties] opens, click the [Advanced] tab and then click the [Printing Defaults] button in the lower left of the dialog box.

-
There is a box in the lower left part of the displayed dialog box where [Color/Black & White] can be selected.
The default setting is [Color], but here, select [Black & White] and click [OK].
-
Return to printer property screen, select the [General] tab and click [Printing Preference].

-
The same dialog box shown earlier is displayed, select [Black & White] in the box where [Color/Black & White] can be selected in the lower left part and click [OK].
-
Returns to printer property screen so click [OK].

-
This concludes setting the printer (printing Black & White as the default).
Last-Modified: April 5, 2017
The content ends at this position.